DNS MX Record
MX Records are responsible for connecting your domain to your email server. Whether you use Webmail included with your hosting account, Microsoft 365, Google Workspace or any other mail provider, you have to have an MX record configured to point to it. Depending on your nameservers, you can manage your MX record and additional DNS records through our portal or your cPanel or DirectAdmin account.
The MX record may have multiple DNS entries but it can only connect to a single mail server. For example, Google Workspace and Microsoft 365 use multiple MX Records. You can not point some of your email accounts to Microsoft 365 for example and some to Google or webmail.
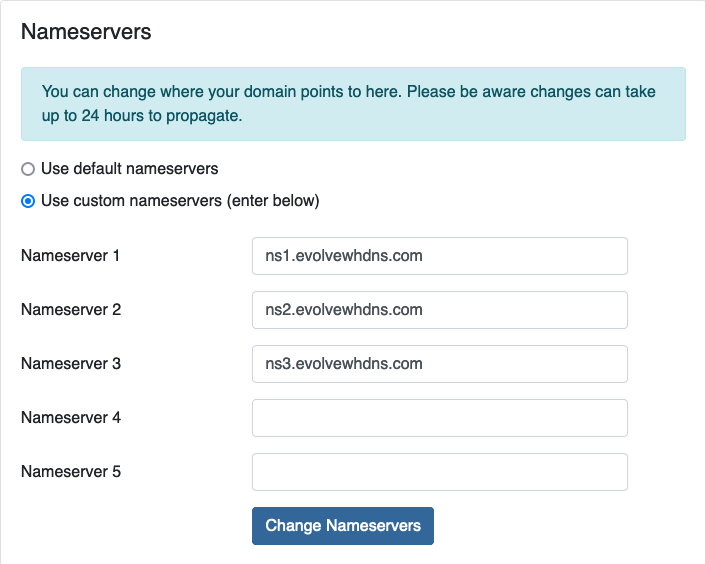
If your nameservers for your domain name are using the following, you can follow these instructions.
ns1.evolvewhdns.com
ns2.evolvewhdns.com
ns3.evolvewhdns.com
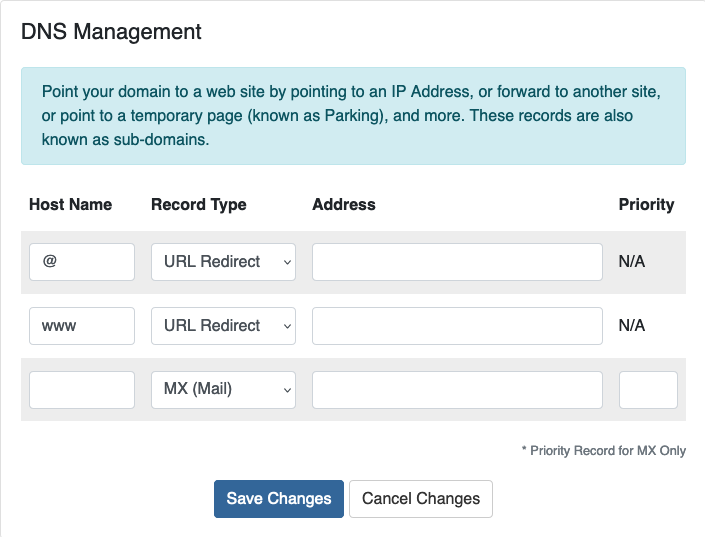
In addition to assigning your nameservers, you need to then go to the Domains Overview page and click on Addons to enable DNS Management (it is free).
Start by logging into the portal at https://core.evolvewebhost.com/login
Once you are logged in, either click on the Domains icon from your dashboard or use the menu to go to Domains > My Domains
On the page that lists your domain(s) registered with us, either scroll and select the domain you with to update the MX Record for or use the search field and then select the domain to load the Domain Overview page.
Once the Domains Overview page loads, locate the link in the left side menu that says DNS Management
This link will only appear if your nameservers are configured properly AND the DNS Addon is enabled.
Once the DNS Management page is loaded, you can view existing records, change and/or add new records.
A couple of great websites for checking the DNS propagation are whatsmydns.net and DNS Checker
If you need any assistance, please submit a ticket for Technical Support
Your Nameservers must be pointing to the records provided by us when you signed up for your web hosting plan in order to manage your MX Record through cPanel
Start by logging into your cPanel Account and under the Domains section, locate Zone Editor and click on it.
On the Zone Editor screen, locate the domain name and click Manage
From the next screen, click on the tab for MX Records to view your existing records. It is a good idea to write these down and then delete them before adding new records.
Next, add the records you’ve been provided with and apply the changes.
DNS propagation can take 48 - 72 hours to fully propagate
A couple of great websites for checking the DNS propagation are whatsmydns.net and DNS Checker
If you need any assistance, please submit a ticket for Technical Support
Your Nameservers must be pointing to the records provided by us when you signed up for your web hosting plan in order to manage your MX Record through DirectAdmin
Next, add the records you’ve been provided with and apply the changes.
DNS propagation can take 48 - 72 hours to fully propagate
A couple of great websites for checking the DNS propagation are whatsmydns.net and DNS Checker
If you need any assistance, please submit a ticket for Technical Support